 Shoupapp
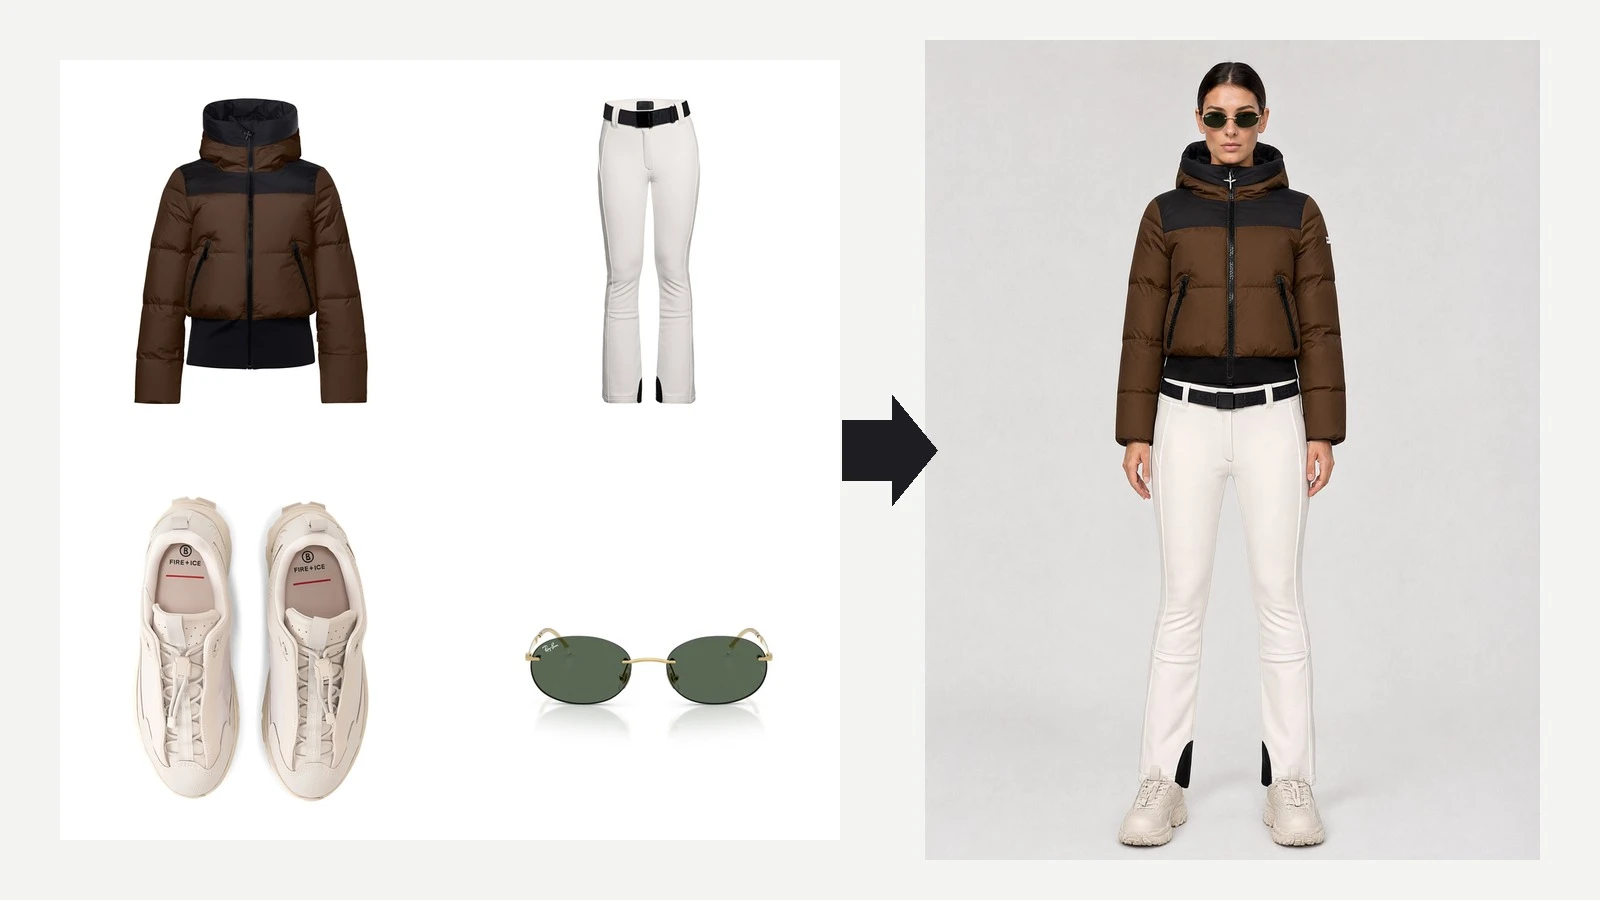
If you photograph clothes on a mannequin, you already have the hardest part of an on-model photo: the garment, shot clean and complete. A mannequin keeps every piece in the same shape and the same pose, which makes a catalog look consistent. What it cannot do is show how the clothes look on a person. This guide covers how to photograph clothes on a mannequin well, and how to put that same photo on a model with virtual try-on, with a real outfit built from four product photos.
Dress form, ghost mannequin or full mannequin?
Three setups are common, and each gives a different photo:
| Setup | What the photo shows | Good for |
|---|---|---|
| Dress form (torso only) | The garment with a visible stand | Tops, dresses, everyday uploads |
| Ghost mannequin | The garment's 3D shape with the mannequin removed | Clean catalog photos for any listing |
| Full mannequin | The whole outfit on a figure with head and legs | Shop windows and full looks |
How to photograph clothes on a mannequin
The same routine works for all three setups. Shoot every piece in a collection the same way and the photos will sit together on a category page.
- Prepare the garment. Steam out creases, remove tags and close every zip and button you want closed.
- Fit it to the mannequin. If it is loose, pin the excess at the back where the camera cannot see it.
- Set the camera at chest height and shoot straight on, so the proportions stay true.
- Light from both sides with soft, even light, so the real color and texture show.
- Use a plain background and keep the whole garment in the frame, hem and sleeves included.
- Add a detail shot of the print, logo or fabric, for the product page gallery.
The ghost mannequin shot
A ghost mannequin photo shows the garment as if it were worn by an invisible body: the neck opening and the inside of the collar stay visible, the mannequin does not. It looks clean on a listing and keeps the shape a flat lay loses. For the step that follows, removing the mannequin is optional. A garment photo works flat, on a hanger or on a mannequin, as long as the whole piece is visible. For a clean listing image, the background remover gives every photo the same white or transparent background.
From mannequin photo to model photo: a real outfit
We started from four product photos: a puffer jacket and ski trousers shot on a ghost mannequin, a pair of sneakers and a pair of sunglasses.

The outfit was built in two passes on one of the 24 built-in models: the jacket and trousers first, then the sneakers and sunglasses. The color blocks, the hood, the zips and the belt on the trousers follow the product photos.


What to check before you publish
Compare the on-model photo with the mannequin photo side by side. Four things are worth a look:
- Length. The hem and sleeves end where they do on the real garment.
- Color. The fabric reads the same as in your product photo.
- Details. Logos, zips, pockets and prints sit in the right place.
- Fit. The garment sits the way it would on a person of that size.
Mannequin photo or model photo: where each one goes
You do not have to choose. The two photos do different jobs:
| Place | Mannequin photo | Model photo |
|---|---|---|
| Main listing image | Where the marketplace asks for the product alone | Where a worn photo is allowed |
| Product page gallery | Shape and details | Fit and how it looks worn |
| Category pages | A consistent grid | One look per collection |
| Social posts and ads | Rarely | Usually |
Next steps
Start with one piece you already photographed on a mannequin and put it on a model with virtual try-on. For the wider picture of on-model photos, read on-model product photos without a model shoot. When a whole collection is ready, automation can dress a model as soon as a new garment photo is uploaded.
Questions about photographing clothes on a mannequin
Do I have to remove the mannequin first?
No. A garment photographed flat, on a hanger or on a mannequin works, as long as the whole piece is in the frame.
Can I use my own model?
Yes. Use one of the 24 built-in models or upload a photo of your own model.
How many pieces fit in one pass?
One or two. A full outfit is built pass by pass, as in the example above.
Does the garment change?
It should stay as photographed; only the person wearing it is new. Check each result against your product photo before you use it.