 Shoupapp
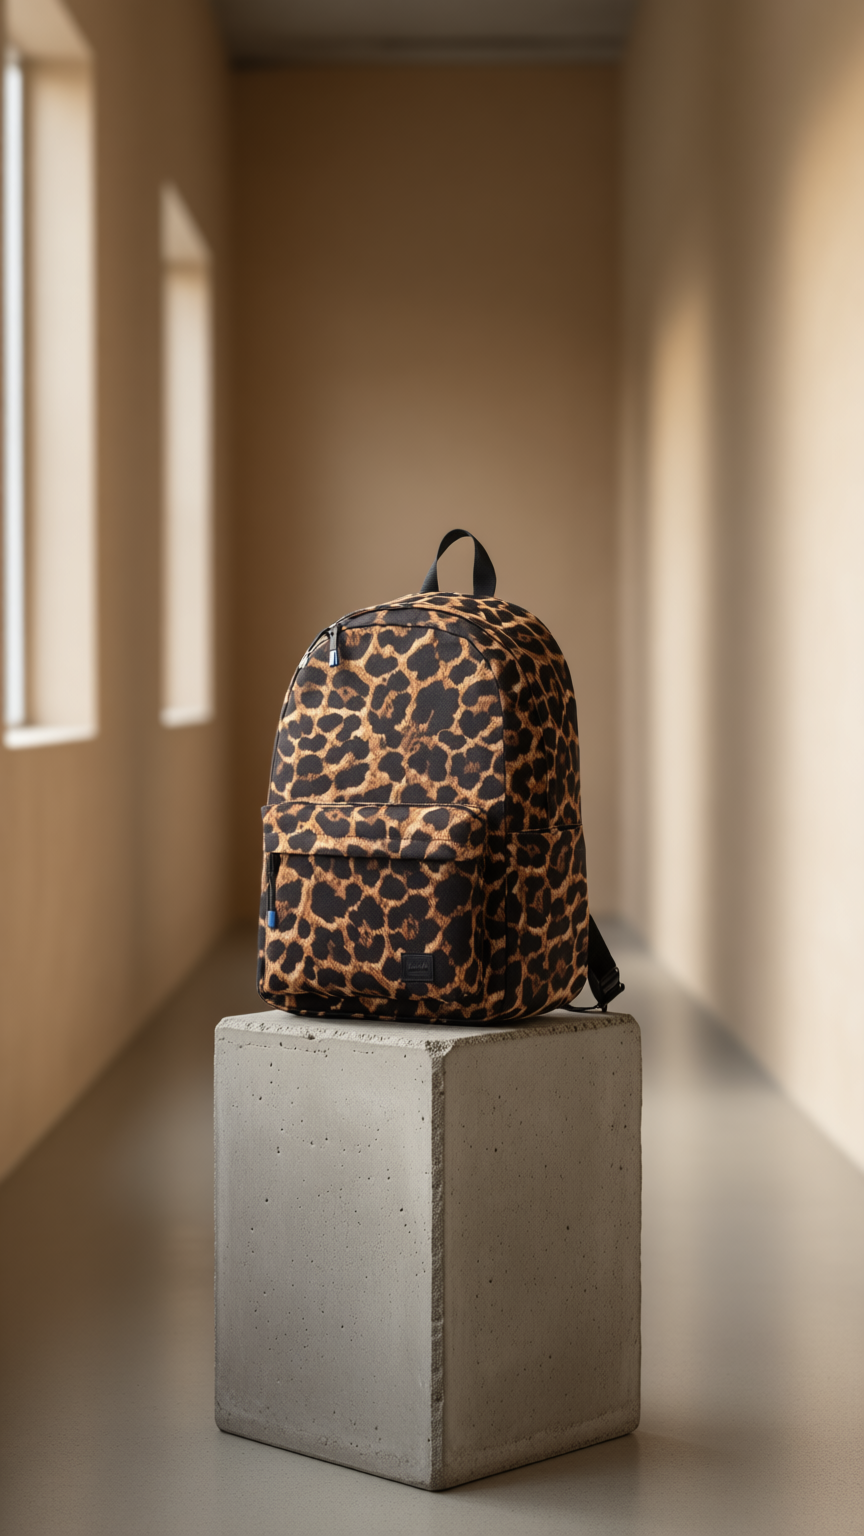
A merchant uploaded one ordinary catalogue photograph of a leopard-print backpack. From that single shot came two new pieces of content: a clean cut-out on a transparent background, and a styled vertical image for social media. There was no second shoot, no studio booking and no brief to write.
 The photograph the merchant uploaded
 The same product, cut out and ready to place
This post walks through what one product photo can become, what each result is for, and how the same steps run across a whole catalogue instead of one bag at a time.
The short answer
One good product photo can give you at least two assets that most catalogues need:
- A cut-out on a transparent background for marketplaces, your own product pages and any design layout.
- A vertical scene photo that places the same product somewhere real, sized for stories, Reels, TikTok and vertical pins.
Both come from the photograph you already have. Neither changes it: the original stays in your library exactly as it was uploaded, and each result is saved next to it as a new image.
Why one photo should do more than one job
Most catalogues are photographed once, for the product page, and then left alone. The same product still has to appear on a marketplace with strict image rules, in a newsletter, on a campaign banner and in a social feed that changes every day. Each of those places wants a different picture, and a new shoot for each one does not scale past a handful of products.
The cheaper route is to treat the catalogue photo as raw material. If the product is photographed well once, the cut-out and the scene can be made from it, and they stay true to the product because they start from the real photograph rather than from a description of it.
Asset one: the cut-out
The cut-out is the workhorse. With the background removed and the edges cleaned, the product can be dropped onto any background without anyone masking it by hand.
Where a cut-out earns its keep
- Marketplace main images. Several marketplaces ask for the product on a pure white background for the main image; Amazon's product image requirements are the best-known example. A transparent cut-out can be placed on white in the exact size each channel wants.
- Your own product pages. A consistent background, margin and position across a range makes a collection page read as one catalogue instead of a pile of different shoots. Shopify's guidance on product media is a useful reference for what a store theme expects.
- Design work. Banners, lookbooks and newsletters all start from a product without its background.
With the background remover, the result is decided once: white, a brand colour or transparent, the margins, where the product sits and the output size. Every photo in the run comes back the same way. If you are doing this for a whole range, our guide to removing the background from multiple images covers the settings in detail.
Asset two: the vertical scene
A packshot sells on a product page, but social media needs a moment. The scene at the top of this post puts the same backpack on a concrete plinth in a warm, quiet loft corridor, lit softly from one side and framed vertically for a phone screen.
The scene is not typed as a prompt. It is picked from a list of more than twenty ready-made scenes, such as marble, warm wood, concrete, a café table or a city street, or left on Automatic so a scene is chosen to suit the product. The image is created at 9:16 from the start rather than cropped from a square, so there is room around the product for a caption and stickers. See the AI product photos page for the full list of scenes.
What makes a scene believable
- The product stays the product. The leopard print and the blue zipper pulls come through as they were photographed. What a shopper sees in a story matches what arrives in the box.
- The setting fits what the product is. A backpack reads naturally on a plinth or a city street; skincare belongs on marble or near water. The closer the match, the less the picture looks staged.
- The light agrees with the shadow. A single soft light source from one side, as in this example, gives the product a shadow that sits where the eye expects it.
For more ideas on staging products without a photographer, read lifestyle product photos without a photoshoot.
Keeping the product true to the photograph
Generated scenes are only useful if the product in them is the one you sell. A few habits make that far more likely:
- Start from a clean, sharp photo. A product on a plain background, in focus and evenly lit, gives the scene the most accurate starting point.
- Name the product if the photo does not. One line such as the product name or the material helps the scene be built around the right thing. It only names the product; it never changes it.
- Review before you publish. Look at logos, text on labels and small hardware such as zips and buckles. If one result is not right, run the scene again or fix it in the photo editor, which is included.
- Keep a series consistent. Use one scene for a whole collection so the posts read as a single campaign.
From one photo to the whole catalogue
Nothing in this example was set up for one bag. The same steps can run as a rule, so every product gets the same treatment without anyone opening each photo.
With bulk processing and automation, you lay the steps out once on a visual canvas and choose what starts them:
- On every new upload, so a new product has its cut-out and its scene waiting by the time anyone looks.
- On a schedule, daily, weekly or monthly at the hour you choose, for example every Monday for last week's new arrivals.
- From a CSV file, when you want to work through a specific list of products.
A run can take up to 1,500 photos. You get an email when it finishes, a step that fails returns its credits on its own, and a rule never reprocesses its own output, so a nightly schedule only works on what is genuinely new.
A short checklist before your first run
- Pick ten products that represent the range, including a difficult one with fine edges or a shiny surface.
- Decide the cut-out settings once: background, margins, position, size and file format per channel.
- Choose one or two scenes that suit the brand, and keep them for the whole collection.
- Run the ten, review them side by side, and adjust the settings rather than individual photos.
- Save the settings as a rule, and let new uploads follow it.
Questions merchants ask
Can the scene photo be my marketplace main image?
Usually not. Marketplaces that ask for a white background on the main image mean the product alone, so the cut-out belongs there. The scene works as a secondary image, on your own store and across social media, where a setting helps a shopper picture the product in use.
Which photos work as a starting point?
Any product photo in your library: JPG, PNG, WebP or HEIC straight from a phone, in any mix. A sharp photo on a plain, contrasting background gives the cleanest edge and the most believable scene. Results come back as PNG, JPG or WebP at the size you set.
Can I try more than one scene on the same product?
Yes. Run several scenes on one product and keep the ones that suit your brand; each is saved as its own image. Picking Trend instead of a fixed scene gives a fresh creative direction each time, which is useful when a feed needs variety.
What about products that are worn or held?
Some products only make sense next to a person. Scenes with the product held in a hand, in use or worn show scale in a way a plinth cannot, and they answer the question every shopper has about size.
Do I need someone to write prompts?
No. Every step is a setting or a preset in plain language: the background colour, the margins, the scene. That is what makes it possible to hand the work to anyone on the team, or to a rule that runs without anyone at all.
What stays the same
The original upload is never overwritten. Every cut-out and every scene is saved as a new image next to the photo it came from, so you can always go back to the source. The same library feeds the rest of your content too, from campaign banners to product videos for TikTok and Reels.
If you want to see what your own photos become, send us a handful and we will run them the way we would run the whole catalogue. Plans and credit costs are on the pricing page.