 Shoupapp
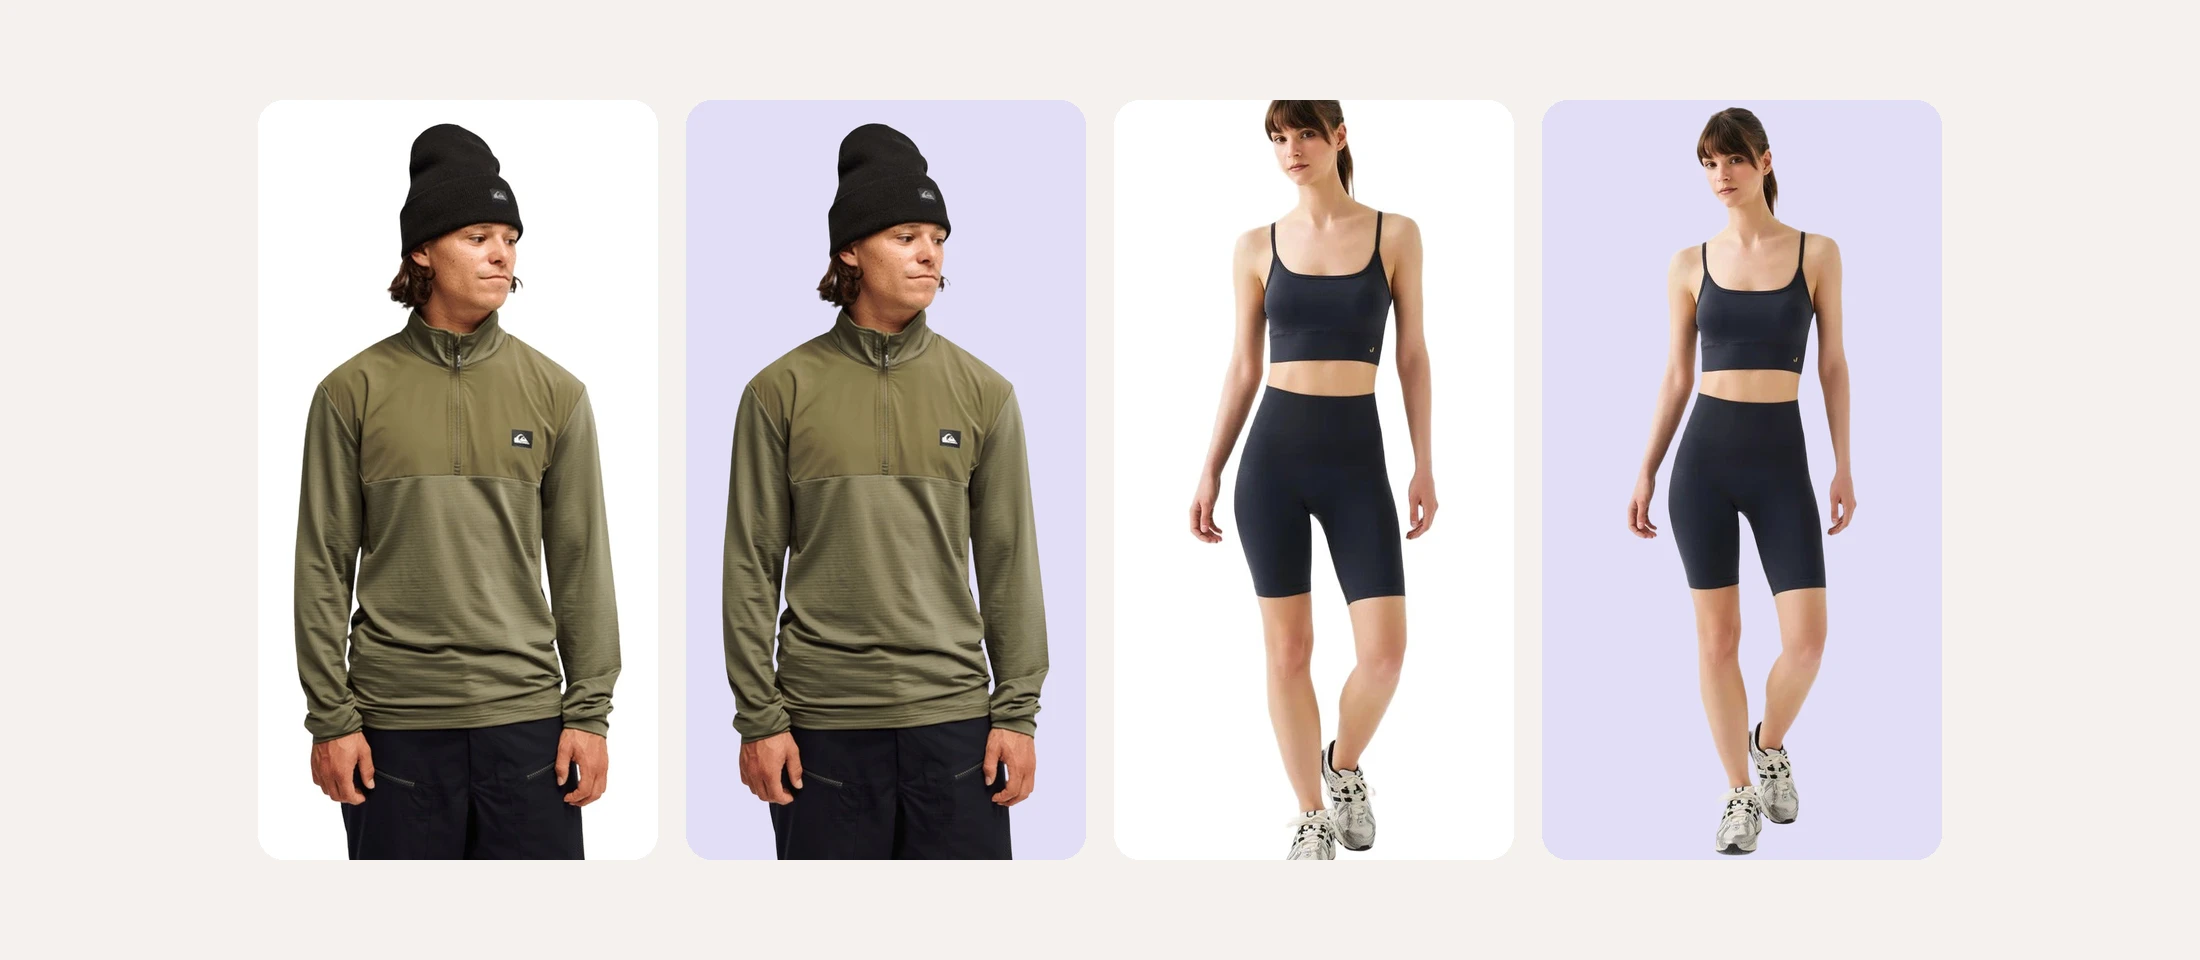
Background removal quality is not about whether the background is gone. Almost any tool can delete a white wall. Quality is what happens at the edges: loose hair, the gap between an arm and the body, a thin strap, a white shoe on a white floor. That is where a cutout looks professional or looks cut out. We took two catalog photos of models, removed the backgrounds and placed the results on a dark color, where every flaw would show. This article goes through what to look at, then how to keep the same quality when the job is 1,500 photos in one batch request.


Why quality shows at the edges, not in the middle
The middle of a product is easy. No tool removes the front of a pullover by mistake. The decision is hard only where product and background meet, and that line is usually a few pixels wide. A cutout that is one pixel too generous leaves a pale halo. One that is one pixel too strict eats into hair and fabric. On a white page neither shows. On a colored banner, a dark theme or a lifestyle scene, both do.
Five places where a cutout goes wrong, checked on real results
1. Hair
Hair is never a clean line. The man's hair curls out from under his beanie, and the woman's ponytail has loose strands. A good cutout keeps those strands partly transparent, so they blend into whatever comes behind them. Both results kept their strands, with no white fringe on the dark background.


2. Hands and gaps
Fingers are small shapes with background between them. The same goes for the space between an arm and the body, or between two legs. Those enclosed areas have to be cleared too, or a patch of the old wall stays inside the product. In both photos the gaps came out empty and the fingers stayed whole.

3. Thin parts
Straps, laces, drawcords and zipper pulls are only a few pixels wide in a catalog photo. They are the first things a rough cutout deletes. The shoulder straps of the activewear top and the laces of the sneakers are both complete.
4. White on white
This is the hardest case in a catalog. A white sneaker on a white floor has almost no edge to find. The sneakers below were separated from the white background without losing their soles or their toe caps.


5. Models cut off by the frame
The first photo ends at the model's thighs. If that cutout were centered on the canvas, he would float in the middle with empty space below. It was placed on the bottom edge of the canvas, where the photo ended. The second photo shows the whole body, so it was centered with equal margins above and below. That is a positioning decision as much as a cutting one, and it matters for how a category grid lines up.
How to check a cutout yourself
Do what we did: put the result on a dark, saturated color. White hides halos and missing strands; dark navy shows them at once. Then look at five spots in this order: hair, hands, thin parts, light areas of the product, and the bottom edge. It is five looks per photo, and it tells you more than looking at the whole image ever will.
Checking quality in a batch of 1,500 photos
Nobody can inspect 1,500 cutouts one by one, and nobody needs to. A bulk background remover applies the same settings to every photo, so the risk is not random. It sits in the hard cases. Check those on purpose:
- Before the full run, send ten photos that cover your hardest cases: light products on white, dark products, loose hair, thin straps, cropped models.
- After the run, sample by type, not at random. Open a few from each group and use Compare to see the original and the cutout side by side.
- Mark the photos that pass as done, and filter for the rest.
- Fix the few that need it in the online photo editor for ecommerce, instead of running the whole batch again.
How a batch request is built, from selection to output, is covered in edit multiple photos at once.
Keeping the same quality every week
Quality also means every photo matches the last one: the same margins, the same canvas, the same file format. That part should not depend on who ran the job. Save the settings as a rule in bulk image processing, and every new upload gets the same cutout, the same position and, if you want one, the same shadow from the product shadow generator. The steps of that canvas are explained in the photo automation workflow guide. Originals are never overwritten, costs are on the pricing page and every tool is on the products page. The best test is your own hardest photos: see it on your catalog.
Cutout quality questions
What makes a background removal look professional?
Clean edges. Hair that keeps its loose strands, gaps that are fully cleared, thin parts that are complete and no pale halo on a dark background.
Why does my cutout look fine on white but wrong on a color?
Because white hides a halo. Always check a cutout on a dark or saturated color before you use it in a banner or a scene.
Do I need to check every photo in a large batch?
No. Check the hard cases on purpose, sample each product type and fix the few that need it.